Should You Use Foil When Roasting Duck? Here’s What You Need to Know

Roasting duck has a reputation for being both a culinary adventure and a potential disaster if not done right. It’s one of those meats that can either turn out succulent and tender, or dry and rubbery. So, when it comes to techniques like covering the duck with foil during roasting, many questions arise.
I’ve roasted my fair share of ducks in my time and thought I’d share my insights on whether foil is your best friend—or something you can do without. Here’s everything you need to know before you start roasting.
What’s the Best Duck for Roasting?
When it comes to roasting, Pekin duck for roasting stands out as the top pick. Its mild flavor and tender, juicy meat make it a favorite for both home cooks and chefs. It also has a thinner skin, which crisps up beautifully in the oven—perfect for that golden, crackly finish we all crave.
Other duck breeds also shine when roasted, depending on your taste preferences. If you like richer, more robust flavor, Muscovy and Moulard ducks are worth trying.
Here’s a quick comparison:
| Duck Breed | Flavor | Best For |
| Pekin | Mild, tender | Classic whole roasting |
| Muscovy | Rich, gamey | Gourmet dishes |
| Moulard | Meaty, intense | Magret & confit |
Key Tips for Roasting Duck:
- Score the skin to render fat.
- Roast slowly at a moderate heat.
- Let it rest before carving.
Roast it right, and duck becomes a showstopper at the table.
Check out: What Kind of Duck Do Restaurants Actually Serve?
The Case for Foil When Roasting: Protecting Your Duck
Let’s start with why some people opt to cover duck with foil while roasting. The first reason often comes down to moisture retention. Duck, unlike chicken, has a rich layer of fat beneath its skin, and if you’re not careful, it can end up more greasy than tender. Wrapping it in foil can help prevent the duck skin from becoming too crispy too quickly, which gives the fat more time to render out without the meat drying out in the process.
Pros of Using Foil:
- Moisture Lock: By covering the duck, you’re trapping moisture inside, making sure that the duck stays juicy as it cooks.
- Even Cooking: The foil acts like a blanket that distributes heat more evenly, helping cook the meat through without burning the skin.
- Fat Reduction: Since the fat stays inside, it reduces the risk of your duck becoming overly greasy.
But is this the best method for every duck roast? Let’s dive deeper.
When Foil Might Not Be Necessary
While the foil method has its perks, it’s not the only way to get that perfectly roasted duck. If you’re aiming for crispy, golden skin (and let’s be honest, who isn’t?), wrapping your bird in foil might be the last thing you want to do. Duck skin needs to be exposed to high heat to render down that duck rich fat and become delectably crispy.
Reasons You Might Skip the Foil:
- Crispy Skin: Foil will trap moisture, and if crispy skin is your goal, you want to let that skin crisp up in the oven without any interference.
- Faster Roasting: If you want the roasting process to move along more quickly, leaving the duck uncovered will allow it to cook a bit faster, as the moisture isn’t being trapped.
The Hybrid Approach: Start Covered, Finish Uncovered
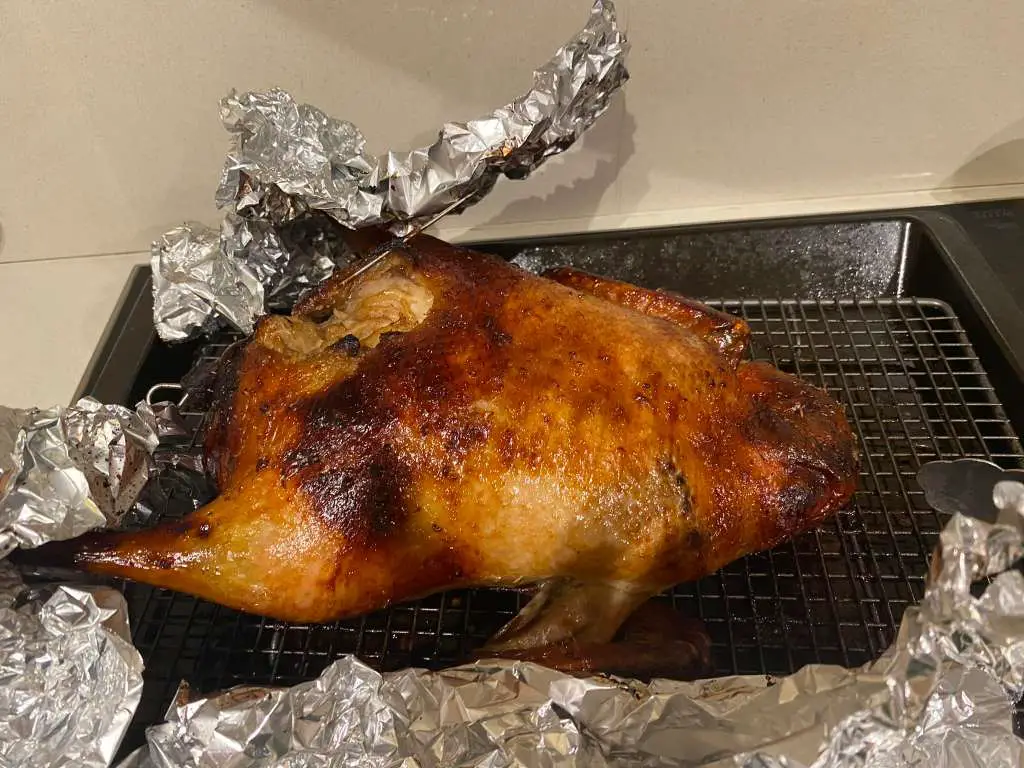
Here’s a method that I’ve found works wonders. When roasting a duck, I like to start by covering it in foil for the first 30-45 minutes of cooking. This ensures that the meat stays moist and that the fat has time to render. But after that, I remove the foil for the remaining roasting time, allowing the skin to brown and crisp up beautifully.
Steps for the Perfect Duck Roast:
- Preheat your oven to 350°F (175°C).
- Prepare your duck by removing any extra fat and seasoning it to your liking. (I like to rub mine with a bit of salt, pepper, and orange zest for a citrusy kick.)
- Cover with foil for the first 30-45 minutes of roasting.
- Remove the foil and continue roasting for the remaining time (about 45 minutes to an hour) to achieve that crispy skin.
- Rest before serving: Let your duck rest for 10-15 minutes after it comes out of the oven. This allows the juices to redistribute and ensures a juicy roast.
Should You Always Cover Your Duck when Roasting?
The answer, as with most things in cooking, is “it depends.” If you’re after moisture and tenderness, foil might be a good choice for the early part of your roast. But if you’re more into a crispy-skinned masterpiece, the foil should be your last resort.
Another thing to consider is the size and breed of duck. Smaller ducks (like Pekin ducks) might need more help keeping moisture in, while larger ones (like Muscovy ducks) might not dry out as easily. You’ll want to tailor your approach based on your specific bird.

Alternatives to Foil: What If You Don’t Want to Use It?
Maybe you’re trying to avoid aluminum foil for environmental reasons, or maybe you just don’t want to deal with the extra step of wrapping it. There are alternatives!
- Basting: One of the best ways to keep the meat moist without foil is to baste your duck periodically. A combination of duck fat and a splash of broth or wine works wonders.
- Roasting in a Dutch Oven: If you’re really after moisture, using a Dutch oven can be a game-changer. The tight lid traps moisture and steam, keeping your duck tender while still allowing the skin to crisp up when you remove the lid at the end.
- Roasting on a Rack: A simple rack elevates your duck and lets fat drip away while still allowing the heat to circulate around it.
How Do You Know When Roast Duck Is Cooked?
When you’re roasting a duck, it’s important to know when it’s perfectly cooked. A few visual and tactile clues can help you determine if your duck is ready. First, the skin should be crisp and golden, signaling that the fat has rendered properly. The legs should also feel loose in their sockets when gently wiggled, which indicates the meat has cooked through.
However, the most reliable method to check is to use a skewer. Pierce the thickest part of the thigh, where the meat is denser. If the juices run clear, your duck is cooked. If the juices are still pink or red, it needs more time in the oven.
Quick Checklist for Perfect Roast Duck
- Crisp, golden skin
- Loose legs
- Clear juices when pierced
These simple steps will help ensure your duck is cooked to perfection without any guesswork.
Final Thoughts: Your Duck, Your Rules
At the end of the day, cooking a duck is all about balance. You want a juicy, flavorful bird that still delivers that crisp skin everyone loves. Whether or not you use foil will depend on your priorities—do you want to prioritize moisture, or are you chasing that golden-brown crunch?
In my experience, starting with foil and finishing without it gives you the best of both worlds. It’s the secret sauce to a duck roast that is both tender and crispy—a perfect combo for a meal that’s sure to impress. So next time you’re getting ready to roast a duck, don’t be afraid to experiment. You might just find that foil is your new best friend in the kitchen. Or maybe, you’ll fall in love with the crispy skin that comes from a no-foil method. The choice is yours!
Happy roasting, and may your duck always be delicious!